Unique DIY Polymer Clay Gemstone Crystal Idea for Home Décor
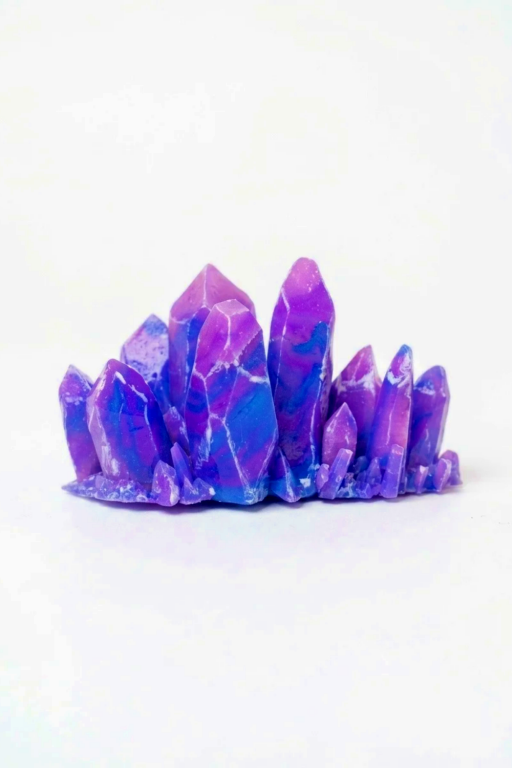
Create your own dazzling DIY Polymer Clay Gemstone Crystal with this step-by-step guide, perfect for crafting unique and professional-looking designs.
Craft shimmering crystal-like sculpture from polymer clay is a fun and creative way to bring magical designs to life. This project is inspired by the dazzling look of gemstones, but it’s much simpler and doesn’t rely on actual stones. With just a few basic materials, you’ll craft a beautiful piece that adds a touch of sparkle to your shelf, desk, or anywhere you want. It’s a great activity for anyone who enjoys crafting or trying something artistic with a unique twist.
DIY Polymer Clay Gemstone Crystal Craft Ideas for Beginners

To design this crystal, you’ll start by molding polymer clay into angular shapes to resemble gems. You can pick vibrant clay colors or mix shades to make marble-like effects that mimic real crystals. By adding texture and using metallic paints or gloss, your finished piece will have a realistic shine. Once it’s baked and hardened, it will look absolutely eye-catching. Whether you make small, handheld versions or larger sculptures, the process is enjoyable and gives you plenty of room to experiment.
This gemstone-inspired DIY is not only fun but also perfect for personalizing. You can create unique color combinations, layer textures, or even turn your crystal-like creations into pendants or decorative items. It’s an activity that’s easy to pick up for beginners and allows experienced crafters to explore their imagination. Simple yet dazzling, this project brings a little sparkle into your day.

Magical Polymer Clay Gemstone Crystal Ideas
Create striking raw crystal clusters using translucent polymer clay and alcohol or water-based inks. This project produces faceted, gemstone-like shards with metallic leaf accents and natural, imperfect coloring. The technique combines surface inking, partial mixing, caning/reducing and careful cutting to achieve realistic crystal forms suitable for jewelry, miniatures, or sculptural embellishments.
Materials & Supplies
- Translucent polymer clay (e.g., Fimo Translucent) — essential
- Alcohol inks (Pinata or similar) or water-based inks (alcohol inks generally give richer results)
- Metal leaf (silver leaf recommended; gold optional)
- Small amounts of colored clay for accents (optional)
- Acrylic paint (white) for edge highlighting
- Varnish (gloss) for final shine
Tools & Equipment
- Pasta maker (strongly recommended for even sheets)
- Sharp craft blade / X-Acto knife — use with care
- Brushes for liquid application and painting
- Work surface protected with a mat or paper
- Oven for baking polymer clay (follow manufacturer instructions)
Project Details
- Skill level: Beginner–Intermediate (handling inks and cutting facets requires care)
- Time: 1–3 hours plus baking/cooling time
- Output: Multiple crystal shards in a range of sizes; scrap clay is reused to maximize material
Preparation
- Condition the translucent clay by kneading until smooth and pliable.
- Protect your workspace (ink can stain). Wear gloves if desired.
- Test your chosen inks on scrap clay to gauge color intensity and drying time.
- Have metal leaf and blade ready before you begin cutting.
Step-by-Step Detailed
Apply and Dry Inks
- Warm and condition the translucent clay well first.
- Apply small drops or rub alcohol ink onto the clay surface; let the ink dry before mixing to avoid over-dilution.
- For faster drying, gently blot and allow air to evaporate — dryness is critical so pigments layer rather than bleed.


Mixing & Creating Organic Color
- Once dry, mix the ink into the clay roughly — you want organic, imperfect blends rather than uniform color.
- Create multiple shades (e.g., violet blends from red + blue) using the same process.
- Cut pieces of every shade and combine them roughly for variety.

Incorporate Metal Leaf
- Add small flakes of silver leaf between layers or folded into the clay for sparkle and texture.
- Fold, press lightly, and run the combined pieces once or twice through the pasta maker to create a textured, layered effect.
- You may also experiment with gold leaf or thin aluminum foil (aluminum may be too thick).
Form the Composite Sheet
- Fold and fold again to produce a layered rectangular block of mixed colors and metal leaf.
- Press into a flat sheet with the pasta maker to achieve even thickness while retaining irregular internal patterns.
Cut Crystal Shapes
- Use a very sharp blade to cut facets from the sheet — study photos of raw crystals for inspiration.
- Cut from multiple angles: top, sides, and ends to produce varied, clear edges and planes.
- Keep shapes irregular; variance is desirable for realism.
- Save all scraps — do not discard leftovers.

Reuse Scrap Clay
- Collect scraps and add more metal leaf; press and form them into a new rectangular piece.
- Cut additional small crystals from the reformed scraps to maximize material usage.
Texture & Rough Elements
- Add small textured clay masses for raw crystal bases; keep surfaces slightly rough to mimic natural crystals.
- Integrate tiny crystal fragments around larger pieces for a clustered effect.

Bake
- Bake the crystals according to polymer clay manufacturer’s instructions.
- Allow pieces to cool completely before further manipulation or painting.
Highlighting with Paint
- Use white acrylic paint sparingly to highlight edges of facets — this sharpens the appearance of edges and increases perceived sharpness.
- Apply paint thinly with a small brush and remove excess immediately with the blade if it becomes too blobby.
- Optionally use black or darker paint to emphasize depth or shadow on underside edges.
Varnish
- After paint dries, apply a thin coat of gloss varnish to achieve the crystalline sheen.
- Varnish also protects surface inks and paint highlights.
Finishing Instructions
- Inspect each crystal for stray paint blobs and scrape gently with a blade if needed.
- Re-bake only if you applied uncured clay after the initial bake.
- Once varnished and fully dry, mount crystals in your chosen setting (resin base, jewelry bezels, or sculptural piece).
Tips & Techniques
- Use alcohol-based inks (Pinata works well) for more vivid, controllable color.
- Let inks dry fully before mixing to prevent muddy colors.
- Keep blade extremely sharp for clean facet cuts; dull blades tear clay.
- Study photos of geodes, quartz, and raw minerals to guide facet angles and cluster composition.
- Be conservative with white paint—small highlights go a long way.
Common Problems & Solutions
- Ink bleeds or muddiness:
- Solution: allow inks to dry fully and mix less aggressively; add more translucent clay to lighten.
- Metal leaf clumps or flattens:
- Solution: use smaller leaf flakes and fold gently; apply leaf in thin layers.
- Paint becomes thick and blobby:
- Solution: thin paint slightly or scrape excess while wet; apply in multiple light passes.
Creative Ideas & Variations
- Use different color palettes (teal/green, orange/amber, or icy blue) to mimic specific gemstone types.
- Incorporate mica powders for shimmer or pearlescent effect.
- Embed small crystal shards into a resin dome for jewelry or paperweights.
- Layer gold and silver leaf for bi-color shimmer.
Final Result
You will produce a set of realistic, raw-looking polymer clay crystals with internal color depth, sharp faceted edges, and metallic accents. These pieces are versatile for jewelry, decorative clusters, or as focal elements in larger sculptures. The process emphasizes imperfect, organic color and efficient use of materials, so you end with visually rich crystals and minimal waste.