DIY Mosaic-Inspired Polymer Clay Pendant for Beginners

Create eye-catching DIY Mosaic-Inspired Polymer Clay Pendants with simple steps to add bold color and charm to your accessory collection.
Transforming polymer clay into unique pendants is an exciting way to express creativity. This project is all about bringing the art of mosaics to life in miniature form. Using vibrant colors and different shapes of clay, you can design pendants that feature stunning, textured patterns inspired by traditional tile mosaics. Not only is this DIY activity simple to learn, but the results are dazzling and personal—perfect for anyone who enjoys art and jewelry-making.
Make Your Own Mosaic-Inspired Polymer Clay Pendant

These pendants are crafted with a mosaic-style design, where tiny pieces of polymer clay come together to create bold visuals. Imagine combining bright colors, geometric shapes, or even earthy tones to form a pendant that looks like wearable artwork. The beauty lies in how customizable the process is—you can craft intricate patterns or keep things simple, choosing designs that truly reflect your style. Working with clay also gives you freedom to adjust sizes, shapes, and textures, making every pendant one-of-a-kind.
Aside from being incredibly satisfying to design, these pendants are versatile and purposeful. They can be used as eye-catching necklaces, thoughtful gifts, or meaningful decorative pieces. With such a relaxing and easy process, this project lets you dive into a world of creativity while producing something beautiful. Each handmade pendant feels special because it reflects your artistic vision, making this DIY experience both fun and rewarding.

Project Overview
Create a mosaic-inspired pendant using white polymer clay, embedded metal pieces, and heat-resistant holographic glitters. The technique arranges small metal fragments into triangular mosaic cells, fills them with glitter, bakes, and seals with resin for a brilliant, glass-like finish.
Materials & Supplies
- White polymer clay (sheet)
- Head pins, eye pins, or straight wire (for mosaic pieces)
- Heat-resistant holographic glitters (multiple shades)
- Liquid clay or glue (optional, to hold glitter)
- Resin (for sealing)
- Sandpaper (various grits for finishing)
Tools & Equipment
- Pasta machine (set to highest thickness)
- Round steel cutter (or desired shape cutter)
- Wire cutter (to trim pins)
- Tweezers (for placing metal pieces)
- Acrylic block (or flat pressing tool)
- Paper (to place between press and clay)
- Pointed brush (for applying glitter)
- Oven (per polymer clay instructions)
- Flashlight or directed light (to inspect shine)
Project Details
- Style: Mosaic-inspired pendant with bold glitter colors and metal borders.
- Size: Determined by the cutter used; round shape suggested.
- Finish: High-gloss resin provides depth and protection; sanding improves smoothness.
Preparation
- Set the pasta machine to the highest thickness and run the white clay through to form an even sheet.
- Prepare metal pieces by removing tips of head pins and cutting them in half with a wire cutter; make multiple small fragments.
- Organize glitters by color to speed application during filling.
Making Process
Follow these sequential steps reflecting the full workflow in the transcription. Important steps are bolded.
Outline and cut the pendant shape
- Place the white clay sheet on your work surface after conditioning.
- Use a round steel cutter and press to outline the shape.
- Remove excess clay from around the cutter to reveal the pendant blank.

Prepare metal mosaic pieces
- Take head pins and remove the tip.
- Cut each pin in half with a wire cutter to create short metal fragments.
- Make a quantity of these pieces so you have plenty to arrange the mosaic.
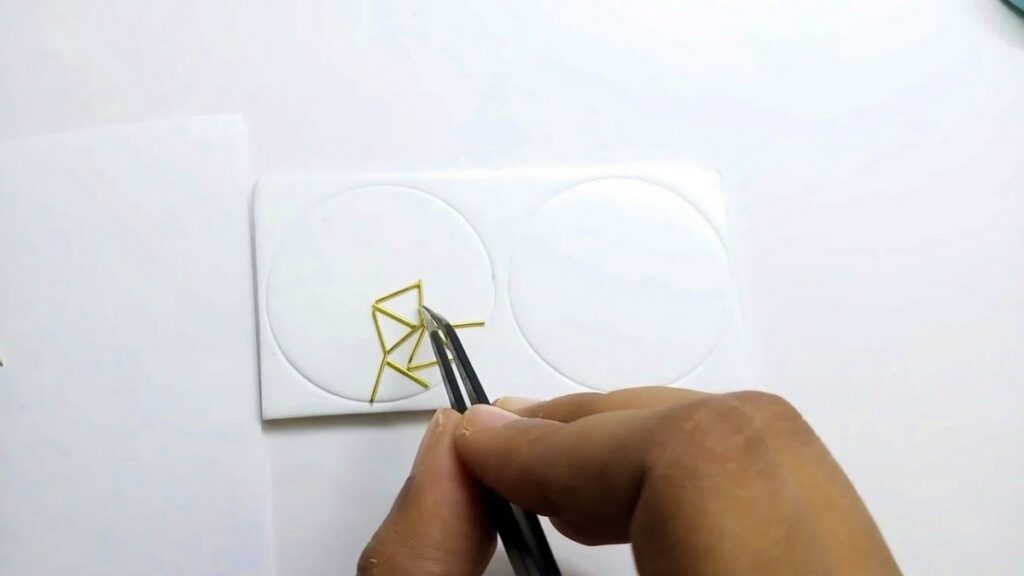
Arrange metal pieces on clay
- Using tweezers, place the cut metal pieces on the clay top.
- Focus on forming a triangular mosaic pattern across the pendant surface.
- Do not press the metal into the clay yet; only arrange them on the top layer.
- Leave flexibility to adjust the pattern later before embedding.

Design freedom and alternatives
- There is no specific pattern required — you can form triangles, squares, or rectangles.
- Use head pins, eye pins, or straight wires as alternatives for varied metal textures.
Embed the metal pieces
- Use an acrylic block to press the metal pieces into the clay gently and evenly.
- Place paper between the block and clay to prevent distortion while pressing.
- Optionally embed pieces individually if you prefer more control or deeper set pieces.
Apply glitter to mosaic cells
- Choose different colors of heat-resistant holographic glitters.
- Apply glitters randomly to each triangle using a pointed brush, creating a colorful mosaic.
- Before applying glitter, optionally coat each cell with a thin layer of liquid clay or glue to help glitter adhere.
- Work patiently — applying glitter is time-consuming; consider speeding up repetitive fills while maintaining precision.
Color choices and cleanup
- Use colors such as light blue, lavender purple, bluish green, and silver to create a balanced palette.
- After filling, remove excess glitter carefully to keep edges clean.

Cut and adjust the pendant
- Cut the shape out of the slab carefully if you worked on a larger sheet.
- If any metal pieces or glitter cells got distorted during cutting, rearrange them before baking to preserve the pattern.
Bake
- Bake the piece for the time recommended by your polymer clay brand; in the example the pendant was baked for 1 hour.
- After baking, avoid disturbing the piece before sealing because metal pieces may fall off if handled too soon.
Seal and finish
- Seal the baked pendant with resin for a glass-like, protective finish.
- After resin cures, sand the edges and surface as needed to achieve smoothness.
- Assemble any hardware (bails, jump rings, chains) once sanding and sealing are complete.
Finishing Instructions
- Resin sealing: pour or brush resin evenly over the pendant. Work in a dust-free area and follow resin curing times and safety guidelines.
- Sanding: start with medium grit to remove excess resin overflow, then progress to fine grits for a smooth edge.
- Final shine: inspect under directed light or a flashlight to confirm even shine and fill any low spots with additional resin if necessary.
Tips & Techniques
- Use tweezers for precise placement of tiny metal fragments.
- Paper between press and clay prevents imprint distortion when embedding.
- Apply glitter in small amounts to control placement and reduce cleanup.
- Let resin cure fully before handling to avoid fingerprints or dust traps.
- Test a scrap piece to ensure glitter and metal tolerate your baking temperature.
Common Problems & Solutions
- Metal pieces falling out: ensure they are firmly embedded before baking; press sufficiently and avoid handling until sealed.
- Distorted pattern during cutting: rearrange metal pieces immediately and re-embed before baking.
- Glitter shedding: coat with liquid clay or glue before applying glitter and seal with resin.
- Resin cloudiness: mix resin slowly to reduce bubbles and use a heat source briefly to pop surface bubbles.
Creative Ideas & Variations
- Try different shapes like ovals or teardrops and mosaic patterns like radial spokes.
- Replace glitter with colored resin or mica powders for different visual effects.
- Use recycled metal scraps or colored wires for an industrial or mixed-media look.
Ending Words
A durable, mosaic-inspired pendant featuring tiny embedded metal pieces and dazzling holographic cells, sealed under glossy resin for depth and protection. The finished piece presents a vibrant, jewel-like effect best appreciated under direct light.