Make a Custom DIY Bat Pin Using Polymer Clay Easily

Design your own DIY Polymer Clay Bat Pin with simple tools and step by step instructions to make a unique polished accessory you will love to wear.
If you enjoy creating fun and spooky accessories, this project is a great one to try. Using polymer clay, you can design a unique bat pin that’s perfect for Halloween or as a playful addition to your outfit. This project is simple yet creative, giving you the chance to make something completely customized. Whether you’re new to crafting or a seasoned DIY fan, you’ll find this idea enjoyable and easy to follow.
Simple DIY Polymer Clay Bat Pin for Accessories

Shaping polymer clay into a bat is an exciting process. You can craft its wings, add small details like eyes, or even give your bat a smile for a friendlier look. Polymer clay is easy to work with, making it possible to bring your vision to life. Once your design is complete, bake your clay to harden it, attach a pin backing, and voilà—you’ve created a wearable piece of art. You can also play around with colors, finishes, or textures to give your bat personality.
The finished pin is both fun and practical. You can add it to your jacket, backpack, or gift it to someone who loves quirky accessories. It’s lightweight, durable, and a creative way to express your love for handmade items. This project lets you enjoy crafting while making a cheerful, eye-catching accessory that celebrates the charm of something you created from start to finish.
Creative Ideas & Variations
- Make a set with different expressions, colors, or tiny accessories (mini hat, scarf).
- Convert the design to a magnet or pendant by swapping the hardware.

Easy Polymer Clay Bat Pin
Create a cute Halloween bat brooch from polymer clay. This tutorial walks through choosing colors, shaping symmetrical wings, adding facial and wing details, baking, glazing, and attaching a brooch fastening. The result is a wearable seasonal accessory ideal for October displays or gifting.
Materials & Supplies
- Dark polymer clay (dark grey recommended; black optional)
- Tiny pieces of white, pink, and light grey clay (for eyes, cheeks, eyebrows)
- Sculpey glaze (for highlights)
- Epoxy glue (two-part) for attaching the brooch fastening
- Brooch pin/backing and small mixing stick for glue
Tools & Equipment
- Pasta machine (optional, for even sheets)
- Acrylic roller or rolling pin
- Cookie cutters (wing shapes and tiny shapes for ears)
- Scalpel or blade for trimming edges
- Medium ball tool for eye indentations
- Needle or small modeling tool for nostrils and fine detail
- Small flat fingers or smoothing tools for attaching elements
- Fine brush for applying glaze
- Curing oven for polymer clay
- Small flat surface (wet wipe) to dry glued pin flat
Project Details
- Style: Cute Halloween bat brooch with subtle facial features.
- Size: Small brooch-scale; depends on cookie cutter and head/body sizing.
- Complexity: Beginner to intermediate — attention to symmetry and small detail helps.
- Finish: Glossy highlights with Sculpey glaze; epoxy-secured brooch backing.
Preparation
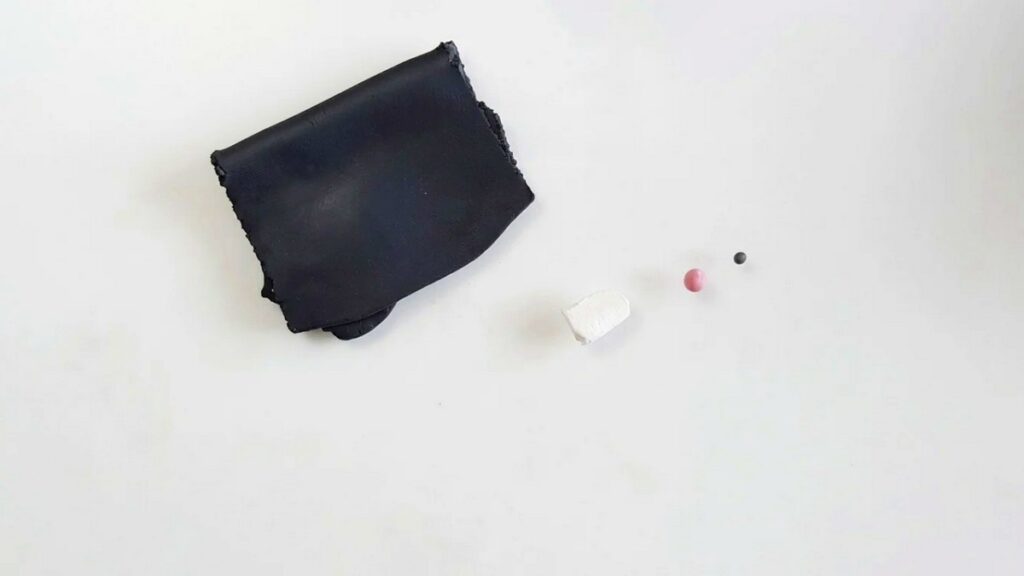
- Condition clay by warming and kneading; run dark clay through a pasta machine for a smooth, even sheet.
- Gather tiny color pieces (white, pink, grey) pre-conditioned for quick application.
- Arrange cookie cutters and tools near your workspace to maintain symmetry and flow.
- Work in good light to better see fine details, especially with dark clay.
Detailed Guide
Follow each step below; important actions are bolded.
Set up and base wings
- Roll the dark clay to an even thickness (pasta machine recommended).
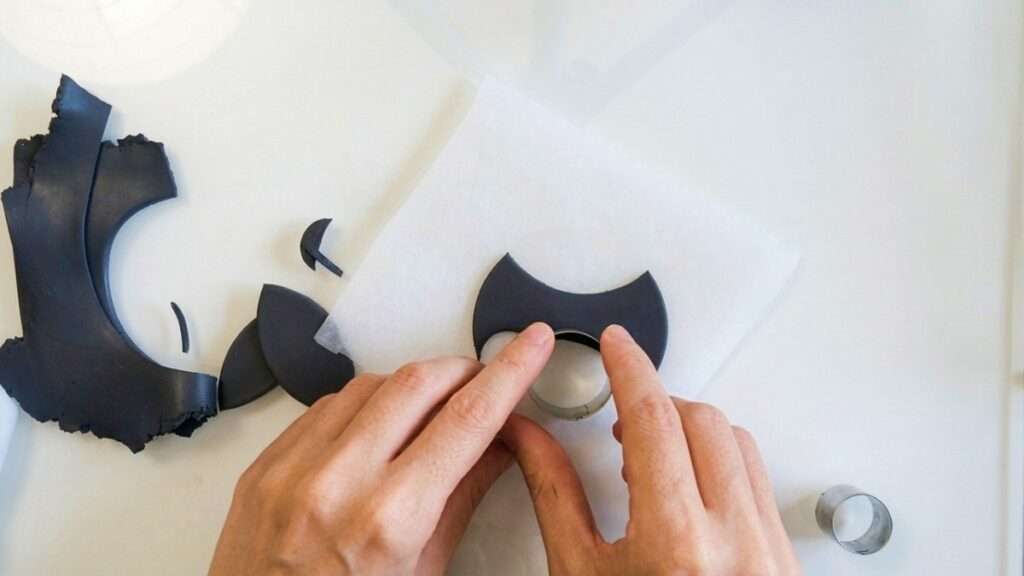
- Use a wing-shaped cookie cutter to cut the base wing shapes; aim for symmetry between left and right wings.
- Trim and refine any rough edges with a scalpel for neatness.

Add wing definition
- Create thin strips of clay (from leftover cutouts or rolled thin) and apply to wing edges to add definition.
- Place strips carefully on both wings to keep the look balanced; thin prefabricated strips from cookie cutter shapes can speed this step.
- Trim ends with the scalpel for a tidy finish.

Form the body and position
- Shape a small amount of clay into a simple body form and position it between the wings.
- Make a small recess in the wing bases where the body will sit so the pieces attach more securely when pressed together.
- Press fingers around joins to ensure a good bond and seamless transition between body and wings.
Mark eye placement
- Use a medium ball tool to make shallow indentations where eyes will be placed — this helps guide placement and ensures even spacing.
- These indentations can be left or filled later with small white clay pieces or beads.
Create and attach ears
- Cut tiny ear shapes using a teeny cookie cutter or freehand small triangles from rolled clay.
- Make ears symmetrical by comparing sizes as you cut; attach to the back/top of the head and press gently to secure.
Add eyes, nose, and nostrils
- Place small white clay pieces into the eye indentations (or use beads if preferred).
- Form a small nose and place it centrally on the face; bats have slightly pig-like noses, so a rounded, shallow shape works well.
- Use a needle tool to add nostrils and a little texture to the nose area.

Add pupils and optional details
- Add tiny pupils with very small black dots of clay or paint.
- Optional: use a lighter shade of grey for the bat body if you plan to use beads for eyes to maintain contrast.
Create feet and secure attachments
- Make tiny feet if desired; these are optional and can be omitted for a simpler brooch.
- Press down around small attachments to ensure everything sits flush and will bake securely.
Facial character details
- Add tiny pink cheeks and small grey eyebrows to increase charm; place these lightly and blend edges slightly for a soft look.
- Adjust any asymmetry before baking—small tweaks are easier now than after curing.

Baking
- Refer to your clay brand’s baking instructions for temperature and duration. Follow them precisely to avoid burning or under-curing.
- Allow the piece to cool completely after baking before moving on to glazing.
Glazing
- Apply Sculpey glaze sparingly to highlights — nose, wing details, and perhaps tiny spots on the wings to create subtle contrast.
- Two coats are recommended to ensure full coverage and durability; allow each coat to dry before applying the next.
Attach brooch backing
- Mix two-part epoxy glue per instructions and apply to the reverse of the cured bat.
- Position the brooch pin/backing centrally, press onto a flat surface (wet wipe suggested) so it dries flat.
- Allow to dry for about 24 hours for full bond strength.
Finishing Instructions
- Check that glaze has dried and the epoxy is fully cured.
- Clean any stray glue or glaze residue around edges carefully with a craft knife or fine sandpaper once fully cured.
Tips & Techniques
- Use dark grey instead of pure black to let details read better in photos and in person.
- Keep elements symmetrical by repeatedly comparing left and right as you work.
- Make small reference indentations (ball tool) to help place eyes consistently.
Common Problems & Solutions
- Cracks where parts meet: press joins firmly and ensure parts are slightly recessed before baking.
- Eyes not visible on black clay: use lighter eye colors or beads for contrast.
- Brooch backing misaligned: position and dry flat to ensure the pin rotates and sits properly on fabric.
Final Result
A charming, characterful Halloween bat brooch with neat wing definition, expressive face, glazed highlights, and a securely attached brooch backing—ready to wear and enjoy throughout October.