How to Crochet Puff Flower for Spring Decor
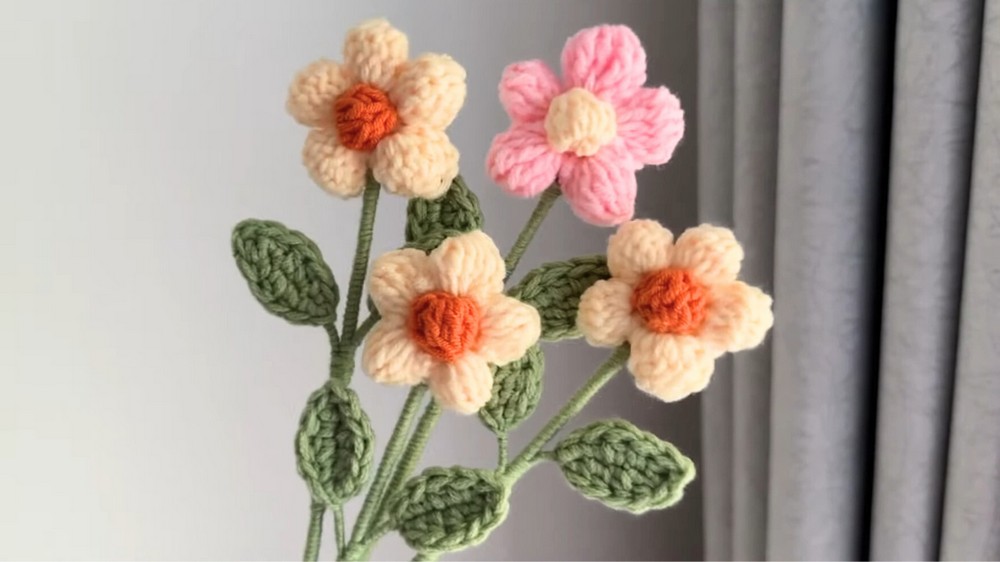
Learn how to crochet small and large puff flower plants with detailed, step-by-step instructions. The guide also covers assembling the flower, crocheting realistic leaves using wire, and attaching them to a floral stem. These flowers can be crocheted in any color and will certainly make your spring special!

Crochet Handmade Puff Flowers
The video tutorial provides step-by-step instructions for creating both small and large crochet flowers. Starting with a slip knot and forming petals using puff stitches, viewers learn how to create intricate floral designs with centers in contrasting colors. A bonus tip explains how to enhance the back of the flower for a polished finish, ensuring professional-quality results.

Making the Small Flower
- Begin with a slip knot and crochet a foundation circle.
- Work single crochets into the center of the circle to form the base.
- Create puff petals using multiple double crochets worked together in a single stitch.
- Chain in between petals to create spacing, and repeat the pattern until five petals are completed.
- Once the petals are finished, cut off and weave in excess yarn to tidy the piece.
- Tighten the center and adjust the petals to make them puffier.
- Use a contrasting color for the flower center, creating a smaller circle with single or double crochets.
- Hide the excess yarn and stuff the center before attaching it to the petals.

Making the Large Flower
- Begin with a slip knot and create a foundation circle, similar to the small flower.
- Use taller stitches (treble crochets) to form puff petals for the larger design.
- Add additional chains between petals to enhance the size and spacing.
- Repeat the pattern to create five petals, finish off, and weave in loose ends.
- Create the flower center in a contrasting color, similar to the small flower but with more stitches for better proportion.

Crocheting the Leaves
- Use a 20 cm craft wire folded in half as the base of the leaf.
- Begin crocheting with a slip knot and chain stitches, wrapping the yarn over the wire for stability.
- Work a combination of single crochets, half-double crochets, and double crochets along one side of the chain to shape the leaf.
- At the tip, add extra stitches to create a rounded edge.
- Mirror the stitch pattern on the other side of the chain to complete the leaf.
- Finish by weaving in ends and ensure the wire stays securely wrapped.
- Repeat the process to create two leaves for each flower.

Assembling the Flower
- Attach the center of the flower to the petals using adhesive or stitching.
- Secure the completed flower to a 4 cm floral stem, wrapping green yarn around the stem to cover it.
- Attach the two leaves to the stem, positioning them evenly on either side.
- Secure the ends of the green yarn to ensure no unraveling.

Optional Finishing Touch
- For a polished look, add a back cover to the flower:
- Create a magic ring and work single crochets into the circle.
- Add a second round with two single crochets in each stitch to create a small disc.
- Attach the disc to the back of the flower to conceal loose ends.

Conclusion
- The video ends with a demonstration of the completed flower, showcasing its detailed design and vibrant colors.
- The tutorial provides creative flexibility to craft flowers in various sizes and customize them for different uses.