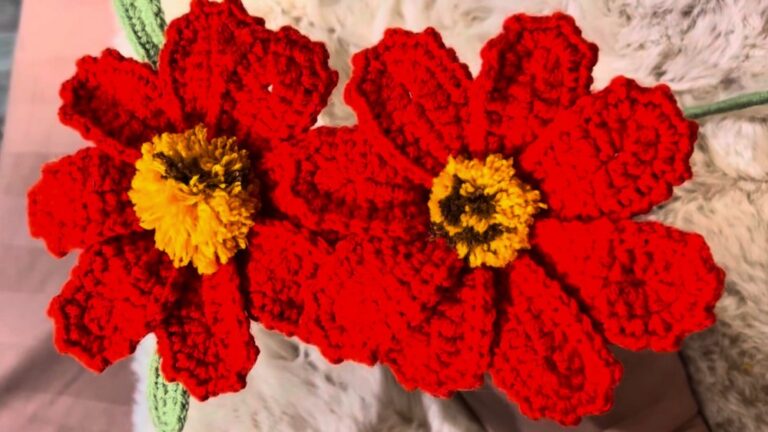
How to Crochet Beautiful Rose Bouquet for Spring

Learn how to crochet a rose blanket that transforms into a bouquet with a step-by-step tutorial for beginners. The final touches include sewing the roses between leaf clusters all around, creating a cozy yet elegant floral design ideal for decor or gifting. Follow through with us for more details about this project!

Crochet Rose Bouquet Tutorial
The video provides a step-by-step tutorial on crocheting a stunning rose blanket that can be transformed into a rose bouquet. Using white, green, and rose-colored yarn, along with a 5mm crochet hook, the creator demonstrates essential techniques like magic rings, double crochets, single crochets, and creating leaves.
Here are the materials needed for crocheting this rose buoquet:
- White yarn for the blanket itself (two balls used).
- Green yarn for the rim.
- Rose-colored yarn for the roses.
- A 5 mm crochet hook.
- Optional tools: scissors and a darning needle for sewing.

Starting the Blanket
- Begins with the magic ring technique:
- Yarn is wrapped around two fingers, creating a loop.
- A crochet hook is inserted into the loop, and basic slip stitches form the base of the blanket.
- The tutorial introduces double crochet stitches:
- Worked into the magic ring.
- Between each double crochet, a chain stitch is created to produce evenly spaced sections in the round.
- The magic ring is closed by pulling the shorter yarn end and connecting the round with a slip stitch.

Building the Blanket
- Once the base circle is complete:
- Each round begins with chaining two to form the height for the next layer.
- Increasing the sectors of the blanket:
- Increases are worked by inserting two double crochets into specific stitches (double crochets from the prior round).
- After each increase, a chain stitch is added to maintain structure.
- The tutorial explains the rhythm of working double crochets between chains and increasing at designated points to expand the blanket.
- The process repeats for each successive round:
- Additional double crochets are added, increasing the number of stitches in each sector until the blanket is the desired size.
- Suggests using two balls of white yarn but allows flexibility depending on the preferred size of the blanket.

Adding the Green Rim
- The tutorial transitions to the rim of the blanket using green yarn.
- Starting the rim:
- Begins with a slip knot and single crochet into a random stitch of the blanket.
- Chain stitches are added and followed by skipping a few stitches before starting another single crochet. This creates evenly spaced gaps within the rim.
- Creating decorative “leaves”:
- Around the rim, clusters of stitches (single crochet, half double crochet, double crochet, triple crochet) are worked into the spaces.
- The tutorial shows how to work stitches in one direction, chain, then mirror the stitches in reverse order to form leaf shapes.
- Each leaf is separated by gaps filled with single crochets.
- At the end of this section, the green rim creates an elegant border with leafy details.

Creating the Roses
- The tutorial moves on to creating crocheted roses with rose-colored yarn.
- Making the rose base:
- Begins with a slip knot and chain stitches to form the foundation row.
- Single crochets are worked into these chains, forming a tight base for the rose.
- Building the rose petals:
- Double crochets are worked into each single crochet stitch, forming multiple layers of petals.
- After finishing this row, the yarn is tied off, leaving a tail for sewing.
- Assembling the rose:
- The crocheted piece is rolled to form a tight rose shape.
- The tutorial demonstrates using a darning needle to sew the rose securely, ensuring it remains tight and does not unravel.
- Tips for rolling the rose help with creating a neat and natural flower appearance.

Attaching the Roses
- Roses are attached between the leaves on the green rim:
- The tutorial shows how to position a rose in the space between two leaves.
- A darning needle is used to carefully sew the rose onto the blanket with a few stitches.
- Ends are tied off securely, and excess yarn is cut to give a clean finish.
Final Product
- Once all the roses are sewn onto the blanket:
- The tutorial displays a completed rose blanket with an eye-catching floral design.
- Provides tips for turning the blanket into a rose bouquet:
- Suggests folding or rolling the blanket to resemble a bouquet that can double as a decorative item.
Summary
- The tutorial combines foundational crochet techniques (magic ring, double crochet, single crochet) with creative design elements (leaves and roses).
- Encourages customization, from adjusting the blanket size to experimenting with different colors.
- The finished product is versatile—serves as an elegant blanket or transforms into a charming bouquet.